Today I'm going to show you the swatches for the Julep nail polishes, Helen and Claudette, as well as show you my experiment with using nail art tape.
Now I'm not going to say that this experiment was a total failure, but there definitely were some mistakes made along the way...
You know, for someone who has a fairly big collection of nail polishes I sure don't set aside a lot of time to do my nails. There's not really any reason for it - it's just something that I have to be completely interested in doing, to do.
In any case, ordering the starter kit from Julep definitely renewed my interest in nail polishes. Furthermore, I recently ordered a few nail art kits from Chapters that I figured it was time to try as well.
Tools:
 |
| Helen & Claudette. |
What I initially was planning to do was to paint all of my nails in the Helen nail polish, which is a very light lilac/taupe-like colour. Doing so, this was the result:
Next, what I wanted to do was to use the nail art tape that I had gotten from Chapters to decorate my thumb & pinkies.
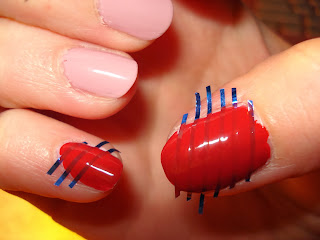
I used nail clippers to cut off the excess tape around my nails. I was initially going to do the same thing on my right hand and just leave it at that, except HERE was where I got the brilliant idea to attempt to recreate a nail design that I had seen some time ago. I don't have a picture of it, but bear with me as I try to explain this nail design. Basically, what I had seen was a black nails that had clearly defined lines of pale green/yellow. The only thing I new about how to achieve this was that I had to use nail tape. How convenient that I had some!
I figured that the was to achieve those clearly defined lines was to put tape on my 1st colour (when it dried), paint the second coat on top of the tape, and then take the tape off eventually.
As a side note -- you can get away with only one coat of Helen, but I decided to put on two coats.
If I was going to eventually take the tape off, I figured it was best to leave the excess tape around my nail. This was the result on my right hand:
...and then add Claudette to the right hand:
After adding a second coat and letting everything dry, I decided it was time to take off the tape. Now THIS may have been where I miscalculated. I'm going to read up about this some more, but I may have either taken off the tape too soon (therefore, I should've let the nail fully dry - although it was pretty dry...) OR I may have taken off the tape too late (therefore, I should've taken it off right as soon as I painted the second coat - maybe I shouldn't have put a second coat - to allow the nail polish to dry and to settle better. Nonetheless, this was the messy result:
Sort of out of frustration, I even ended up marking up my middle finger and messing up the Helen nail colour on it. Sigh... In any case, this experiment was worth trying!
Since I was going to take off the nail polish anyways, I used this moment to try out the micro nib nail polishes I got from Chapters:
 |
| Playing around...I'm clearly NOT an artist. :) |
 |
| If you look past the blob, this may actually have some potential :) |
I believe it was on Sunday that I painted my nails. It is now Thursday, and even though I forgot to put on a top coat, my nails have the tiniest bit of chipping. My thumbs do have a few markings on them though. In any case, this was worth trying!
Thank you for reading! Cheers!


